
Our son is dressing up as Draco Malfoy from the Harry Potter series for Halloween this year. He paid for the official robe with his own hard-earned money but didn’t have enough for the wand. Malfoy’s wand is notably more simple than most of the wands in the series so I decided to try making one for him.
I ended up making two since one acted as a bit of a prototype and the other was the “finished” version. Both look roughly the same, though, so it’s not clear which is better.
Build Video
For the visual folks, here’s the video I made detailing this build.
Reasonably Pliant
As far as I know, Draco’s wand is one of only a few wands for which J.K. Rowling specifically mentions the length. It is “Hawthorn and unicorn hair. Ten inches precisely. Reasonably springy [‘Reasonably pliant’ in the movie]”.
I don’t have access to Hawthorn wood nor anything like unicorn hair, but I do have a 1/2″ hardwood dowel. Rowling doesn’t say what the diameter of the wands are, but 1/2″ seems like a reasonable value for a wand, right? I started by measuring off 10″ and cutting it on my rough-cut miter saw:

The majority of the shaping was done on a belt sander. I suppose I could have used a plane or chisels or maybe even a lathe, if I had one. But Draco’s wand is possibly the plainest wand in the Harry Potter lore and since it just had a few curves in it, the belt sander seemed like the logical choice.
It already had a very rough grit paper in it — maybe 60 or 80 grit — and so all I needed to do was clamp it down to a work table.

It took only a few minutes of easy shaping to get the gentle curve towards the tip as well as the sharper curve at the handle end.
The low grit in the belt sander made short work of shaping, but it also left the wood in a very rough state. I was planning on trying to stain it later so I wanted to get it relatively smooth to start. I accomplished this with a few minutes of hand sanding with 220 grit paper on a sanding block.

Brown, One Way or Another
I was rooting through the cabinets in my workshop and came across some stain left there by the previous homeowner. It was a Minwax Brazilian Rosewood gel stain circa 2002. I have no idea if stain can actually last that long, especially if it’s exposed to the egregious temperatures in that cabinet over the summer. It was there and the color on the can looked right, though, so it was worth a try!

Gel stain is different than “normal” stain in that it doesn’t get absorbed into the wood anywhere near as much. It acts almost more like paint in this regard. You wipe it on; let it sit for a little bit; and then wipe it off.
Now I don’t know if I didn’t let it sit long enough or if I didn’t mix the stain beforehand enough or if it was just no good from the long shelf-time or who knows what else… but the end result wasn’t very good. It was significantly lighter than I had hoped for and was notably blotchy. There were several very noticeable darker spots and some other clearly lighter spots. Not good at all.
Handily, that was only an experiment and I already had a can of brown spray paint on hand to do the job for real, if the stain didn’t pan out. It didn’t and so I sprayed.

I sprayed it in one of the workshop side rooms which unfortunately does not have a light. I used a spring clamp to hold on to the tip of the wand and then hung the clamp from a piece of 14 gauge romex wire. I sprayed with a typical spray can, but I did use one of those adapters that makes it super simple to use those cans repeatedly.
Seriously, I wouldn’t use a spray can at all any more without one of those adapters, now that I’ve used them.
I applied three coats of brown with a couple minute wait in between each coat. After that dried, I sprayed on a coat of clear to protect it for the next step.
A First Time for Everything
One of the reasons I decided to make this wand was to try out using a hot glue gun for the first time. Yep, I had never used one before. It’s not an uncommon tool in woodworking, though, and so I thought it high time to buy one and figure out how it works.
I did make some very elemental mistakes when I first started. For instance, did you know that you need at least two glue sticks in the gun in order to use it? I didn’t know that and so I only inserted one stick. It wasn’t until the ratchet mechanism ran out of stick to push well before the stick made it to the hot tip did I realize my mistake. Good to know!
My goal was to apply a consistent bead of glue around the wand in two places to make handle guards. A proper wand done up in a lath would have those bits carved into the wood but in my case, I needed something to add to it. Hot glue was supposed to dry to a decently hard state so I gave it a try.

My procedure was to slowly spin the wand in a groove in a work table, keeping it from going back and forth, while holding the glue gun stationary. I did try some test pieces earlier with a more freehand style and that didn’t work out at all!
As it is, even this method didn’t work out as well as I’d hoped. The problem was that the glue came out in blobs rather than a consistent thickness bead. I don’t know if that’s a property of glue guns or if my inexperienced technique was wrong. The end result looked like this after it dried:
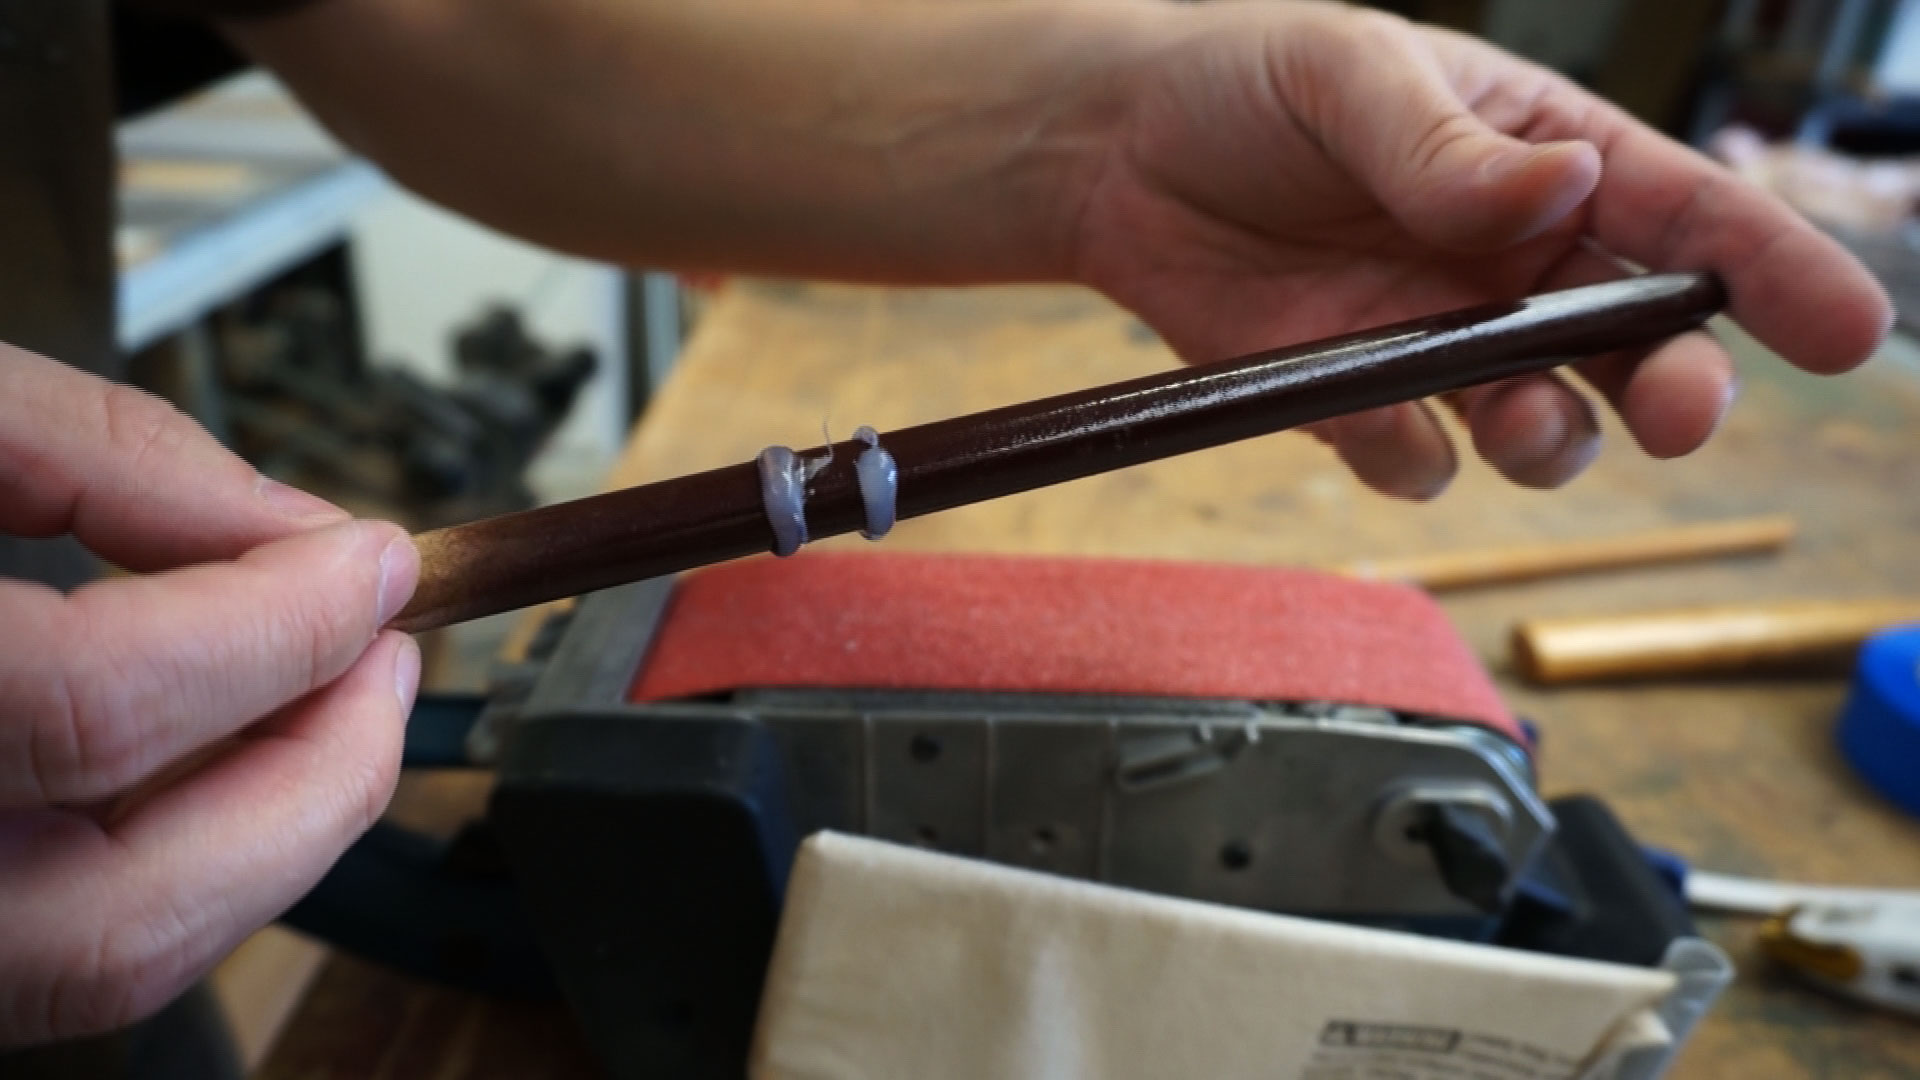
That needed to be fixed in two ways. The diameter of the guards needed to be made consistent to tamp down some of the more egregious blobs of glue and then the thickness of each needed to all be normalized.
I used the belt sander to make the diameter consistent. That was mostly me slowly spinning the wand over the running sander until it looked right. That part was very easy since the sander easily worked through the glue.
Getting the proper thickness was mildly more tedious. I used a utility knife to cut along the side to square them up. That absolutely worked, but the glue sticking to the wand and to itself slowed down the process quite a bit. From a pure time perspective, this step took the longest.
In the end, it looked like this:

Not great, but not bad. My thinking was that it would all be painted black when it was done and so it wouldn’t be very noticeable. Indeed, it’s not.
Finishing Up
The handle is jet black. I didn’t even bother trying some kind of stain or similar and just went directly to the spray paint. I thoroughly taped over the brown parts to not get any overspray. I debated doing a quick clear coat over the tape line to prevent any bleed under. That trick works well if paint bleeding is going to be a problem. In this case, since I was going to be holding the wand so that the painted part is on the bottom and since the tape line was right at a vertical element (the top guard), I didn’t think it was necessary. It wasn’t.

I did three coats of black, like the brown before it and let it dry.
The texture of the painted wand was a little bit rough and so I decided to try sanding it with 320 grit paper to just knock down the texture a bit.

That worked… but I apparently didn’t have as thick a paint layer as I thought since even that very light sanding sanded through the layers in a couple places. It wasn’t a bad look since it has the effect of grain and that had its own appeal… but it was different than intended so I only did one of the wands that way.
The final step was to apply a clear coat. I used a Polycrylic spray since that’s worked well for us in the past. I wanted to spray the entire wand at once, though, so I couldn’t use my normal clamps.

My workaround was the screw in a #6 screw into the tip of the hand and hang it via a think piece of wire. This gave me full access to the entire wand at once, short maybe a millimeter or two at the tip. I did a few coats of clear just like all of the other sprayed layers and let it dry overnight.
I colored in the hole left by the screw using a black Sharpie marker.
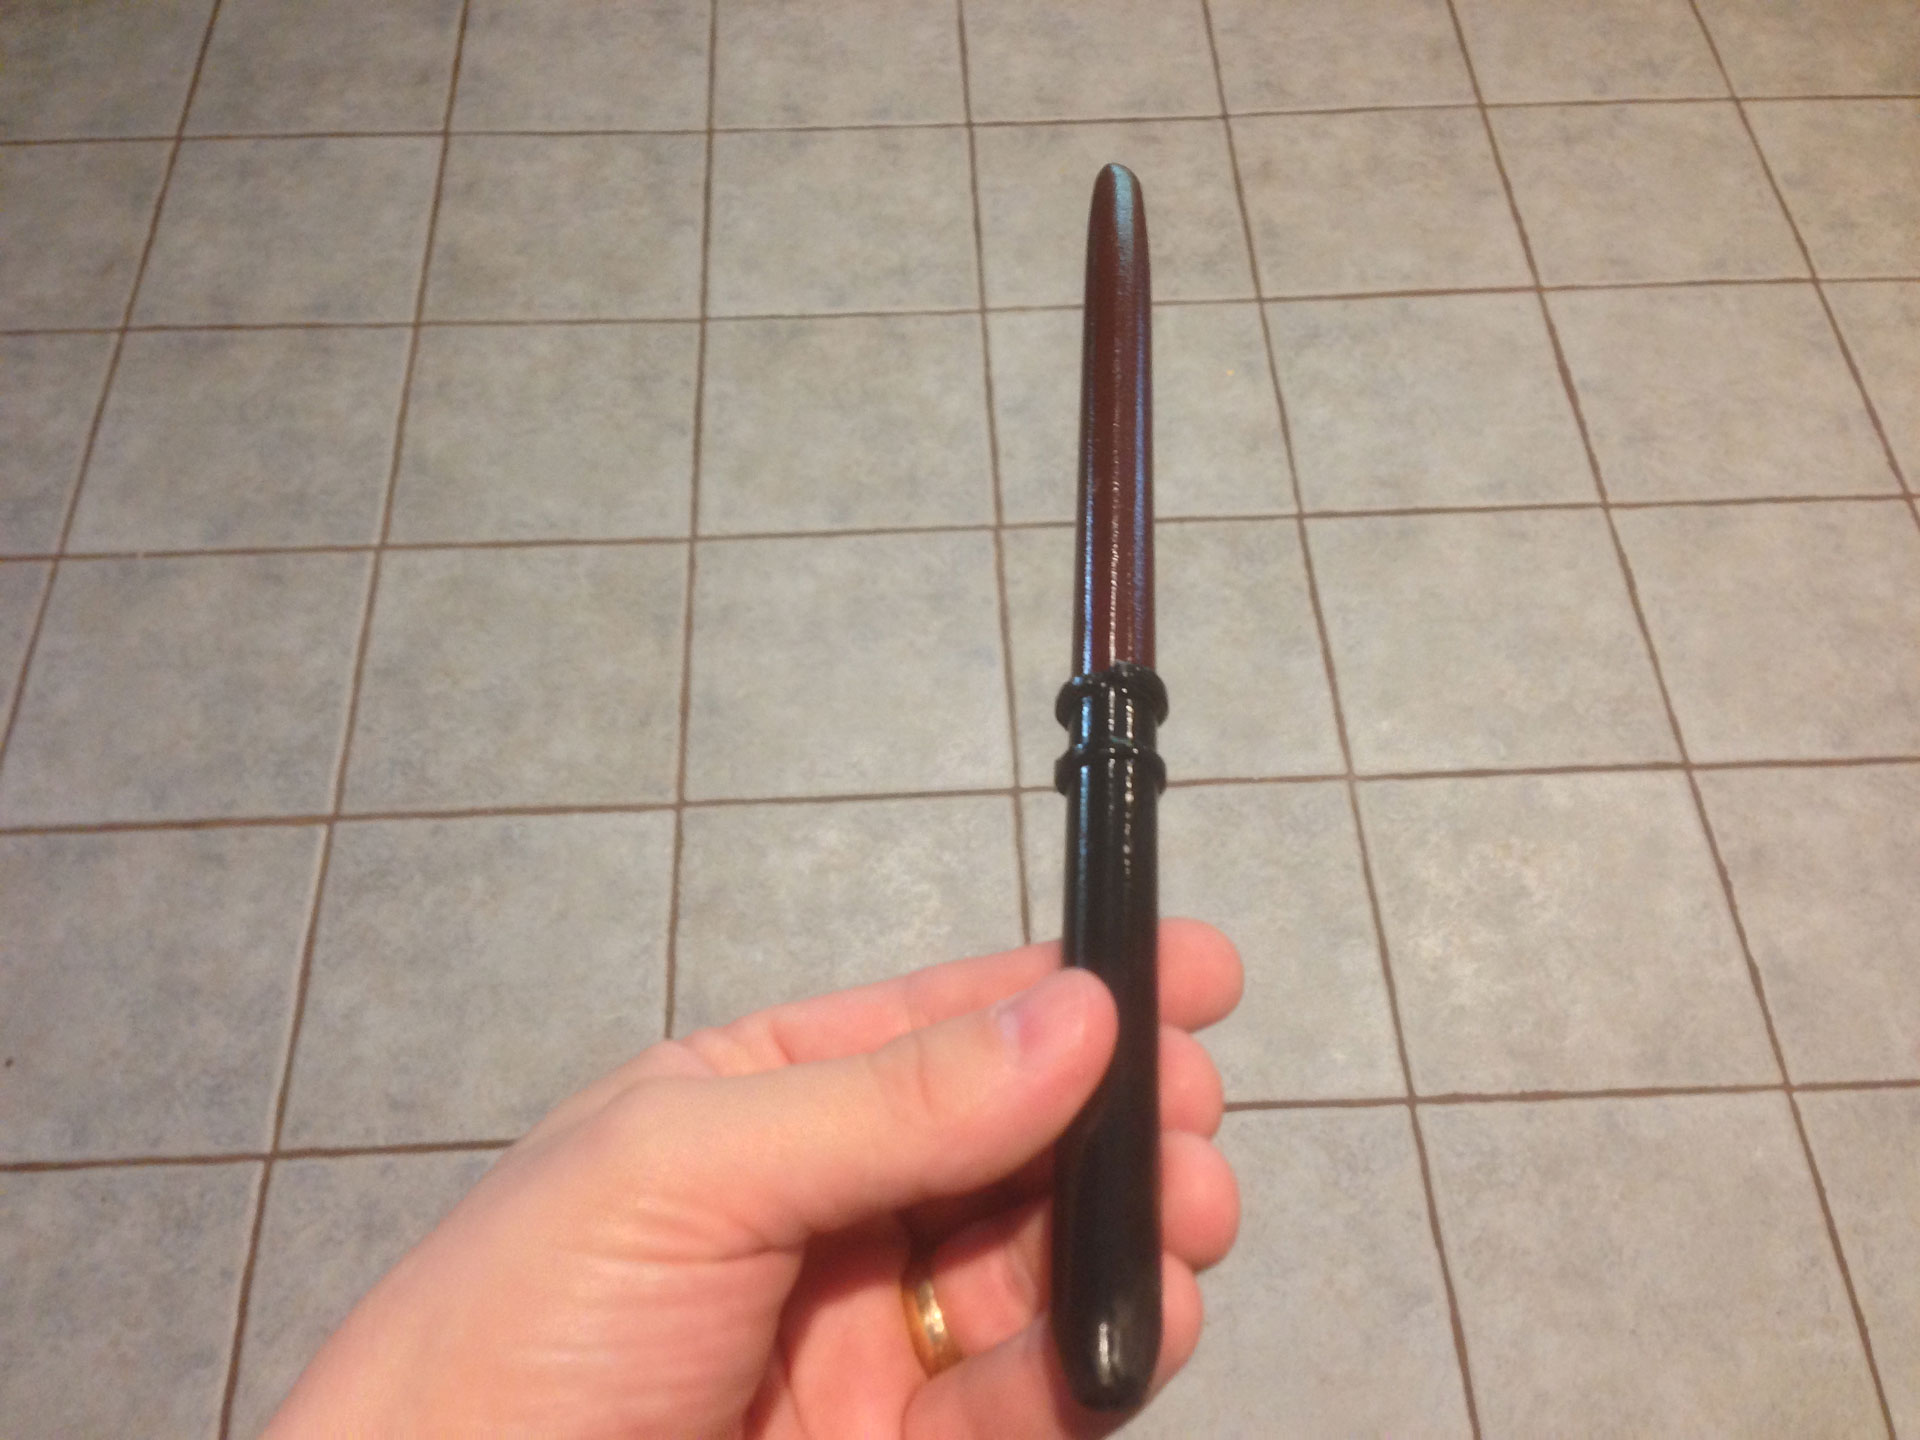
All Done
Here’s what it looks like all finished.
I’m not going to make another one since I already have twice as many as needed… but if I did, I likely would do a few things differently. First, I wouldn’t use hot glue to make the hand guards. Instead, I would experiment with some kind of moldable putty. Maybe just roll it out into a thin bead and then wrap it around the wand and press it in? Or maybe a moldable plastic like Sugru? No matter what, I’d like it to be something that I could work and shape while it’s not super hot.
I’m also going to have to create a better spray booth for future projects. Using that particular room won’t work since it’s too dark in there. I can’t see what kind of painting job I’m doing until I’m done.
Other than that… it’s okay. Simple and our son loves it!