
Which Panel Carrier Should You Buy?
I find myself lifting heavy sheet goods on a regular basis and I nearly always do it on my own. When you consider that a full 4×8 sheet of drywall or plywood typically is in the 50lb to 70lb range and a full sheet of 3/4″ MDF weighs a whopping 85lbs, then the need for some tools to help out became self evident.
I have three such panel carriers, each with their own unique strengths and weaknesses. So which panel carrier is best?
The Budget Pick: Stanley Panel Carry

The Stanley Panel Carry is the budget pick and is typically the one most used by the pros. It is ubiquitous and available darn near everywhere.
You usually see it in orange or yellow; mine is in green. It retails for between $7 and $10, typically.
Using It
To use it, you lift the panel up somehow and place it on the Stanley’s “hook” roughly in the center of the panel.

Then, crouch down and grasp the handle with your dominant hand. Stabilize the top of the panel with your other hand. Lift up the panel using your legs and not your back. Carry it to wherever it needs to go.

Strengths
The Stanley’s biggest advantage is its price, since it’s a fraction of the cost of the other two options.
The angled handle also allows you to grasp it with your hand and wrist at a natural angle. This is far easier on your wrists than carrying a panel without a carrier. No comparison at all!
The weight is relatively uniformly distributed along your body (with one notable exception). It’s much more manageable than using nothing.
The panel position allows you to raise and lower the panel while you are carrying it. This gives you the opportunity to climb over sills or thresholds or the like, since the panel is already a foot or so off the floor and you can raise it even higher.
And finally, the panel is relatively easy to maneuver while carrying.
Weaknesses
The “somehow” in placing the panel on the Stanley is a chicken and egg problem. You need to lift the panel to get it on the Stanley but the Stanley is what you lift it with. I typically just grasp one side of the panel and use a corner as a pivot point to lever it up. This gives me some room to slide the Stanley under it. This does have the very big disadvantage of possibly chewing up that corner since you have a lot of weight riding on it. In particular, I find that I have to always cut away that corner if it’s MDF since it’s nearly always rounded or flattened.
The weight is mostly evenly distributed but the one notable exception is that quite a lot of the weight is born by front of your palm. Unless you have a very muscular hand, it’ll get tired decently quickly. Wearing gloves helps quite a bit and it’s still better than the awkward angle that your hand is wrist is at without a carrier, but yes, your hand will be very sore at the end of the day.
Using this carrier does not make the panel lighter. You still feel every pound of it. It’s easier to handle, not lighter.
It’s hard to see where you are going unless you are extremely tall. I’m 6′ and I can’t see over a 4×8 panel, meaning that the view to my right is completely blocked off. Yes, I’ve run into many things that way.
Finally, the Stanley is made of plastic, which gives it a cheap feel. It is inexpensive, so that makes sense.
The Quick Picker Upper: Gorilla Gripper

The Gorilla Gripper clamps on to the top of a panel and uses the panel’s own weight to tighten the clamping pressure. The more the panel weighs, the tighter it grips. It’s not unlike one of those old-school Chinese finger traps in that respect.
The Gripper goes for about $50 and I’ve only found it online.
It is very solidly built out of aluminum with grippy pads in the clamping part. The clamping is done entirely via leverage. Here it is “loose”:

Using It
To use it, you place it over the top of a panel with one pad on each side. Then pull up on the handle. This upward pressure uses the levers inherent in the design to tightly clamp down on the panel.

Release the pressure on the handle and the clamp loosens. I’ve heard some reports of a panel slipping in use but I don’t see how that would be possible. This design holds on very tightly as long as you are carrying the weight.
To lift the panel, crouch down and hold your arm close to your body with your hand and palm facing up. Reach up and grasp the nicely padded handle. Finally, lift up with your legs. The panel is now lifted to shoulder height.

Strengths
This is the only panel carrier that solves the chicken and egg problem. You simply walk up to the panel and pick it up with no fuss and no extra steps. It is by far its biggest advantage.
The visibility is very good since the panel can only go up to shoulder height. You can see all around you while carrying the panel.
The handle is very comfortable (much much more so than the Stanley) since it’s so thickly padded and the Gripper as a whole is very solidly built.
The weight is distributed along your arm and doesn’t put any extra stress on your hand, like the Stanley does.
It is just as easy to maneuver as the Stanley.
Weaknesses
Since it only lifts the panel to shoulder height, you need to be relatively tall to use it with 4×8 sheets. That is, measure your shoulder down to the floor and if it’s less than 4 feet, then you can’t use this. You might be able to lift the panel higher if you’re a weight lifter, but I cannot at all.
The weight is almost exclusively born by just your arm. In particular it feels like you are doing bicep curls while using it. Since it’s not as distributed as the Stanley, the panel does feel notably heavier over time than with the Stanley. This is because just your arm will get tired faster than your arm plus torso will.
It’s difficult to walk over obstacles since you cannot raise and lower the panel while carrying it. Measure your shoulder to the floor and subtract 4 feet and whatever is left over is how high an obstacle you can walk over while using the Gripper. My shoulder is roughly 5 feet up so I have no more than a foot of height to play with.
The Long Distance Option: Panel Panel
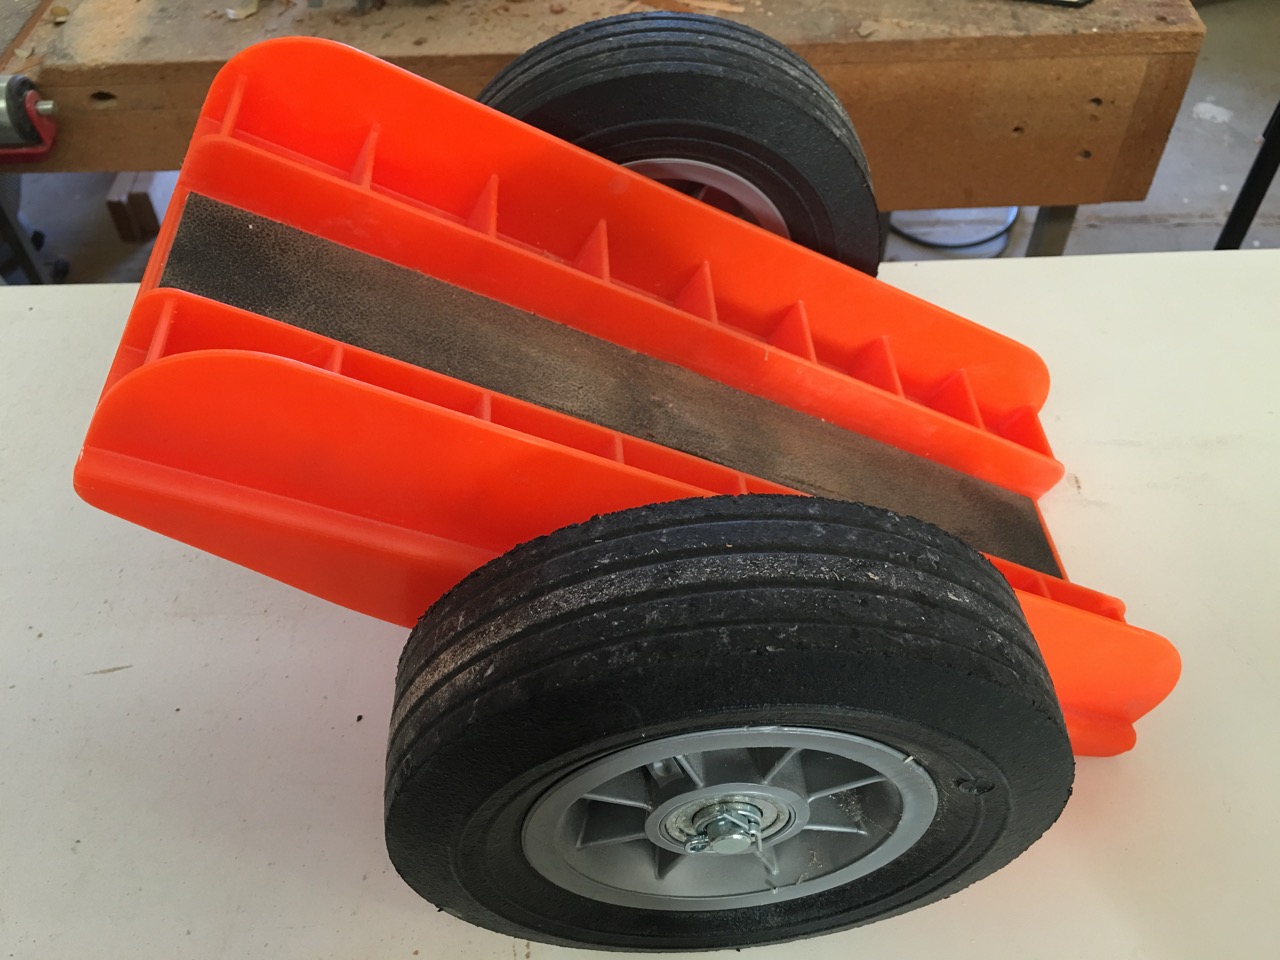
The Panel Pal is the only one of the three that has wheels on it and so is the only one that will actually offload some of the weight for you.
It retails for $50-$60 and is available exclusively online.
It is made almost entirely out of plastic.
Using It
Pick up the panel somehow and place it on the rubber padded part of the Panel Pal. I find that putting it near the center of the sheet offloads the most weight, but makes it harder to maneuver. Putting it 3/4 along the length of the panel seems to be the best compromise of weight distribution and maneuverability.


Once in place, just pick up the unsupported end (it’s now far lighter than the whole) and push it to where it needs to go:

Strengths
It has wheels, so it offloads the majority of the weight of the panel. Neither of the other two make the panel any lighter. This one does. If you have a lot of sheets to carry a long distance, then this is the only one that will not significantly tire you out over time.
Since it supports the weight, you can sometimes carry more than one at a time. I found that having a helper makes this a lot easier, if the helper supports the front of the panels.
It’s far less expensive than it’s normal competition. Most wheeled panel carriers are in the $250 to $300 range and up!
Weaknesses
The panel is not clamped into place. As a result, the panels like to shift around on the Panel Pal, which can make steering it harder than you’d think.
The center of gravity is high on the panels and since they are not clamped in place, they have a tendency to want to tip over. More energy is spent keeping them upright then from supporting or pushing them.
Basically, a carrier with four wheels and a clamping mechanism would be far easier to support and steer than the Panel Pal is.
The wheels are small so even tiny bumps or thresholds will be too much for it. It’ll get over gravel or grass or any smooth surface, but that’s about it. Forget about rolling into into a house over a door threshold.
The Panel Pal is made of plastic, which gives it a somewhat cheap feel. Considering it is the most expensive carrier in this list, you might expect it to be at least as solidly built as the Gorilla Gripper. It’s not. All of the metal wheeled panel carriers are far more expensive, though.
Which Panel Carrier Is Best?
Honestly, I recommend buying all three if you carry a lot of heavy sheet goods.
The Panel Pal is great for long distances but is no good at any threshold. It stops cold at any doorway. It also has the “chicken and egg” problem in that you have to get the panel on the Panel Pal in the first place. All that said, when I was carrying dozens of sheets of drywall a good 100 feet or more, I found the Panel Pal to be absolutely invaluable!
The Gorilla Gripper is the only “pick up the panel and go” option and is by far the easiest to use. There’s just no messing around. Clamp and lift. But you do need to be taller to use it and it makes the panel “feel heavier” more than the other two. I wouldn’t want to use this for multiple panels. Also, thresholds can be a problem if they are high due to the shoulder height restriction.
The Stanley Panel Carry is versatile and inexpensive but don’t underestimate how much weight is loaded down on the front of your palm. That gets very uncomfortable very fast. I can carry more panels than with the Gripper, but am more selectively sore afterwards. Also, getting the panel onto the Stanley is a pain. You can’t beat it for carrying a piece of drywall over a window sill, though.
So I end up using all three of them. Here’s my procedure:
I approach the panel with the Gorilla Gripper. I pick it up (trivially) and place it down on the Panel Pal. I hook the Stanley on top of the panel (upside down) and push the panel to roughly where it needs to go using the Panel Pal. After I arrive, I take the Stanley and since the bottom of the panel is already raised up, I just hook it under that and carry it to the final destination. It works very well.
Seriously, Break It Down
If you are tall enough; won’t be carrying too many panels at once; and don’t mind the price, then the Gorilla Gripper is hard to beat.
If you are shorter; don’t want to spend the money; or will be carrying the panel over a higher threshold, then the Stanley Panel Carry is the obvious choice.
The Panel Pal is only justified if you are carrying a lot of panels over a long distance. Get the Stanley with it to go that final bit over the threshold.
Thank you for reviewing Panel Pal. We would like to extend to you are sincere gratitude. As a note: How you get over thresholds and steps is 1/4 inch plywood. 16 inches by 24 inches works great. Also going up steps is good with simple ramps. Making Panel Pal out of plastic was on purpose. Number one it is lighter, number two it will not scratch customers homes (our metal prototype gouged my floor), and number three it was affordable so people could afford it. The tool to make Panel Pal was an investment of over $25000 which we have finally paid off after 4 years. My brother is an expert plastics engineer for Automotive groups and we made it orange which I insisted on (easy to spot), and we made it out of a high strength polyethylene which has properties of flexibility and strength. The upper deck handles boxes like doors and windows. The reason I made it was for my back breaking at 40.
One tip is when your sheet goods are first delivered, have 2×4 strips on the floor to place them on. Then you already have a space to place the tool of choice underneath without corner damage.