")
Finishing Up
This post is a continuation of the two part series on building columns for our home theater. It covers making “black mirrors”, creating doors with inset mirrors, installing 35mm/euro hinges, building fabric frames, and installing the columns. See part one for everything else.
Making Mirrors
One of the planned standout aesthetic features of the columns was going to be “black mirrors” on the doors. You’ll see what I mean in a bit.
The mirrors needed to each be 11″ x 20″ so I started with a sheet of 1/8″ plate glass from HD with a size of 16″ x 20″. That meant that I only needed to make one cut each. I have a video on cutting glass in this post:
That’s a generic video, though, and this is specific to the columns. I started with the necessary tools which is pretty much just a glass cutting wheel, a straightedge, a Sharpie, and a tape measure. Oh, and the glass.

I used a drywall T-square just because that’s what I had on hand. I used a Sharpie since I have terrible luck with wax pencils. I started by making a mark at 10-7/8″ to account for the width of the cutting tool from the edge to the center of the wheel. I believe it’s actually 3/32″, but I don’t need anywhere close to 1/32″ accuracy in this cut:

Next up is scoring the glass with the cutting wheel. This is pretty easy — just press down with moderate pressure and make one smooth pass along the straightedge. It makes a “crunching” sound while making the score line.

Said scored line looks like this up close. It looks exactly like a scratch on the glass and not at all like a crack.

Next step is putting a fulcrum of some sort underneath the scored line. I used a dowel since I had one handy.

And final step is to put on some gloves and apply steady pressure on the glass on both sides of the fulcrum. It snaps very easily and has a perfectly straight edge.

Apparently it’s razor sharp, too, as I got multiple “phantom” cuts (didn’t know about them until they bled) while handling the glass without gloves. I just switched to using gloves.
At this stage, I have a pane of glass that’s the right size, but it’s not a mirror. To turn it into a mirror, I simply need to paint the back of the glass black.
I had some flat black latex paint out from painting a different part and so I decided to try using that paint instead of spray paint, as a lark. Did it work? Nope! It was a complete and utter disaster!

Yeah, it had some reflective properties, but it was massively streaked and it peeled off at even the lightest touch. Lesson learned: latex paint does not stick to glass.
I actually already knew that very well so I’m not sure why that didn’t pass my mind this time around. Oh well.
I fixed the mirror by spraying it with Rustoleum acrylic paint, which is what I used in the past. It doesn’t matter if it’s high gloss or low gloss. It works perfectly:

You can see what I mean by “black mirror”. It’s definitely a mirror since it’s very reflective, but it gives everything a deep black feel at the same time. I love the look of those.
Making Doors
I wanted the doors to be 3/4″ thick but also wanted my mirrors to be inset. My first attempt was to route out that space using a custom built long router base (will be doing a video on that in the not too distant future) and a jig. That sort of worked, but it was a massive pain and took far too long and generated far too much dust to be worth it. So I fell back to plan B, which is to use 1/2″ MDF as the base of the door and build a frame around the mirror out of 1/4″ hardboard. The combined thickness is 3/4″ and the mirror is inset.
I started by gluing some 2″ wide hardboard strips to a potential door:

But quickly realized that it would take too long to do it that way and so future hardboard pieces were glued but then tacked in place using 3/8″ staples. No photos but that is in the video.
The doors were painted black to make up for any tiny gaps between the mirror and the white hardboard frame. The door was originally planned to be 24″ and so would have a 20″ mirror and then two 2″ pieces on top and bottom. I realized after the prototype, though, that that’s too long for three of the column locations and so I changed the design on the spot to be 23-1/2″. That meant that the bottom piece was reduced to 1-1/2″. I attached the top and bottom hardboard pieces with the mirror held temporarily in place to ensure that I got a good fit:

All staple holes were filled; it was primed; and them painted white. The mirror is attached using hot glue:

My thinking was that using hot glue makes a relatively strong connection but not necessarily a permanent one. Therefore, if the mirror ever breaks then I can possibly pop it out of the door and replace it without having to replace the entire door. I’d definitely have to replace it if I used something like construction adhesive.
Installing the mirror was as simple as pressing it into place:

Euro Hinges
I’ve always wanted to try my hand at installing 35mm or “euro” hinges but never had a good excuse. Well, I made sure to make an excuse by deciding to hang my doors using euro hinges! I bought a 35mm Forstner bit and a set of full overlay hinges. The hinges came with paper templates to layout the holes, but those are entirely inadequate. That’s because it’s very important to have exact placement of the holes and paper templates are essentially unusable after the first set of hinges. So I made some jigs using the paper templates:

The templates have a “fence” on them that registers with the edge of the board and then a center line that lines up with a line on the board. The two of those make for very precise hole locations time after time.
I started by striking a line between the door and the column to make sure the two pieces match up. Euro hinges are well know for adjustments but you might as well start out with everything correct to minimize having to adjust.

Then I used one of the templates to guide the Forstner bit on my drill press to the right location. My procedure was to use the template as a guide and press the pointed part of the bit into the door. I then removed the template and used the pressed in point to center the bit as I drilled to the proper depth.

The template has guides for the pilot holes for the screws, but I found it easier to use the actual hinges in this case. I have a self centering drill bit that is made specifically for hinge screws and so I just put the hinge in place and used that bit to create the pilot holes. Simple!

I did use the guides on the other template to locate the pilot holes for the hinge part that’s on the column.

I don’t have any photos or even video of actually hanging the door. Weird.
Fabric Frames
I made the frames for the acoustically transparent fabric frame part out of some scrap primed popular that I had laying around. I just cut out the sizes I needed from the scrap and spray painted it black using the same paint I used for the mirrors. That was far quicker than painting them by hand.

Next up is measuring off some fabric to cover the frame. I am using the same Scott landscaping fabric that I used elsewhere in the MVP version of the theater.

The fabric easy to work with, works pretty well acoustically, and is pretty cheap… but it is also extremely flammable. Worse, it melts when it burns and emits a nasty smoke and odor. So yeah, I’m eventually going to replace it with some proper fabric like GOM. I’ll likely replace the entire frame when that time comes.
I marked out the size needed using chalk and then cut using scissors. It cuts very very easily.

The fabric is attached to the frame using upholstery staples driven by my upholstery gun. I didn’t spend an inordinate amount of time trying to keep it flat since it’s just temporary.

Pictures of the completed frame can be found floating around in later photos.
Column Hanging
The columns are hung on the wall using two plywood cleats. For three of the four cleats, I attached them to the back of the column (one near the top, one just under the shelf) using pocket screws. The other column has it’s own section, as you will soon see.

You can see one of the fabric frames chilling out in the background of the above picture.
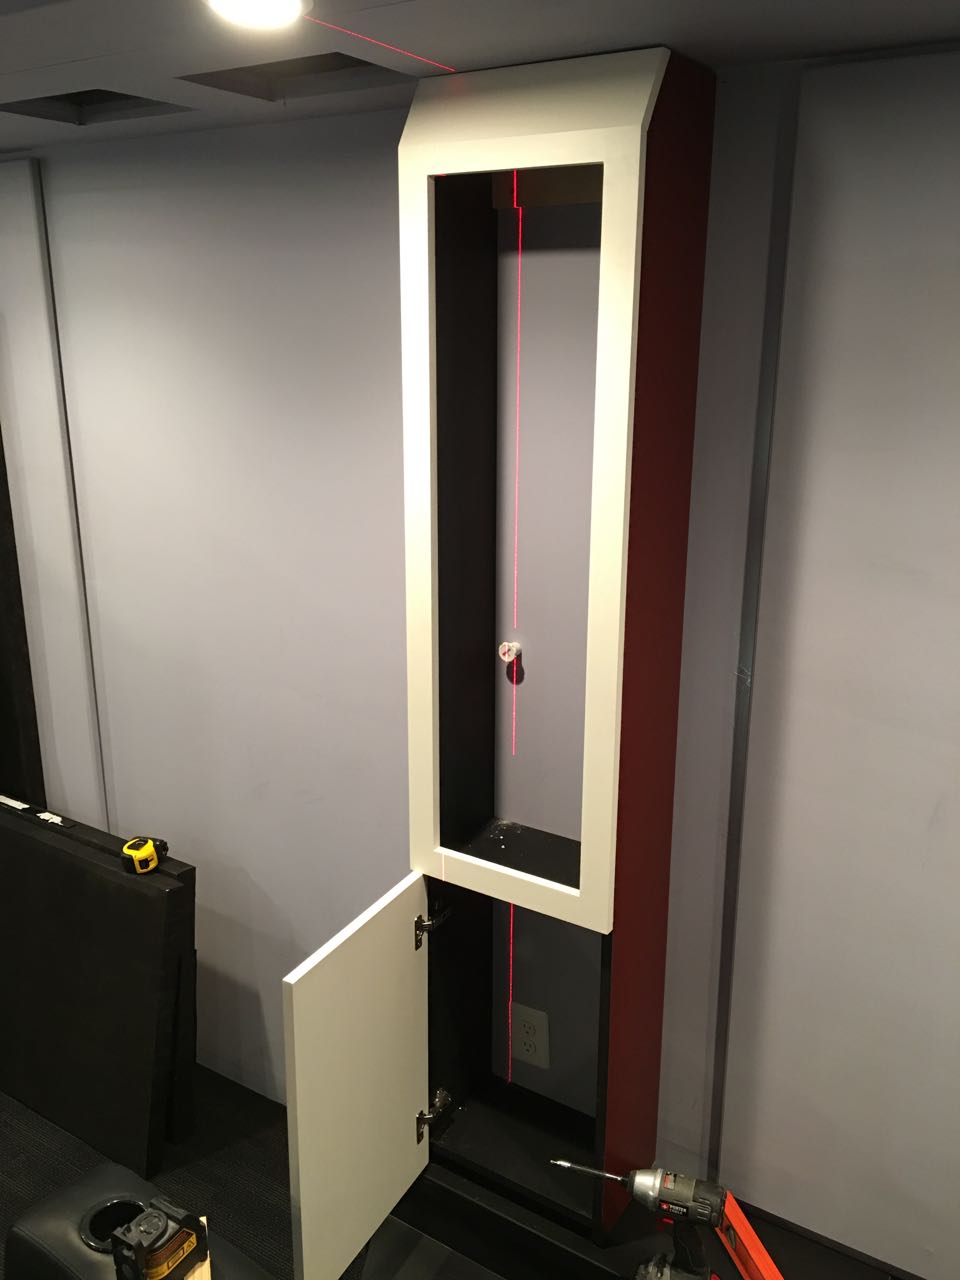
I found the stud using a combination of a magnet and my laser level. I actually have all of this info in my SketchUp model but it was quicker to use this method this time.

Each column is raised up to to the soffit and give itself around 1/2″ of clearance from the riser. I didn’t want the columns touching the riser in any way since the riser is decoupled from the walls and resting the columns on them would effectively recouple them.
The columns are attached to the wall using a pair of 3″ screws driven though the cleats and directly into a stud. They are there pretty solidly.
And here’s what it looks like fully installed and with the fabric frame in place.

The frames were sized to fit pretty tightly in the face frame, since I was planning on using just a friction fit at this point. Maybe when I remake the frames I’ll make them with stiffer material and so will want to use magnets or similar… but for now, there’s no connection method other than friction keeping them in place.
Custom Cuts
One particular column stands out as being a notable pain. See, there is one spot in the back of the theater where the riser is connected to the rest of the world. Specifically there is a conduit that runs from the equipment closet into the attic and then down into the riser. That vertical conduit meant that I had to cut custom holes in my column shelves to accommodate it since, well, it’s a permanently installed conduit.
I measured out the placement and width and cut as much as I could with a jigsaw. I didn’t have enough space to make the curve so that was done using a spade bit.

I did that in the theater since I didn’t trust making the cuts beforehand. In retrospect, I probably should have done it in advance since it would have been far easier.
But wait, there’s more!
I totally forgot about the second connection into the riser. There is a flexible conduit running from the electrical outlet that will be hidden by the column that goes into the riser. This is also permanent and so I needed a hole in the bottom shelf that handled both the vertical solid conduit and the smaller flexible conduit. I didn’t realize that until I had already moved the column into position. Talk about having to work in cramped spaces and generating tons of sawdust in an area where you really shouldn’t have any!

The video shows better how awkward working on this was.
Done
And here’s what they look like completely installed!

All in all I can say that I’m reasonably happy with the end result. I definitely like the look from a distance. I’m also going to keep replicating that theme of a 30 degree angle plus those colors. But if I did this all over again, I probably wouldn’t use hinges on the doors. They do make them stick out more than I’d like. Magnets would make more sense. Also, doing the painting piece-by-piece was far more of a pain than was justified. Future columns would definitely be primed once after construction and then painted once after that.
Maybe the mirrors aren’t worth it, either? You can’t even see that they are mirrors from most angles. Heck, you can’t see the mirrors at ALL for the two back columns and can only see that the front two have mirrors when sitting down in the front row and looking to the side. Yeah, not worth it. Maybe I can use that concept somewhere else in the theater, though. We’ll see.
Hey Kurt! I found your video on youtube and was instantly grabbed by multiple things in your home theater. The columns look great!
I built 4 custom columns in my home theater as well (with future plans to build two additional rear corner ones) but with some different applications. My current 4 cover serve multiple purposes. One covers some pipework/plumbing, three are used for media and general storage (I have about 1000 CD’s, 500+ DVD’s and 200+ Blue Rays, not to mention about 100 Xbox/PS games) and two of the 4 are ofcourse for speaker concealment. I, for one, really liked what you did with the “mirror” black panels but I can understand why they didn’t make much sense for you in that application after the fact. I might do something similar with the columns I have that aren’t concealing speakers.
I do have one question for you… do you have any info, pics, or videos of the soffits being built? Soffits and lighting is my next project and I would love any info, insight, and/or tips you might have.
Thanks in advance and keep up the good work!
Yes, I actually detailed my theater build so far in an excessive amount of detail on AVS Forum. Here’s the start of the thread and index page: http://www.avsforum.com/forum/19-dedicated-theater-design-construction/1508600-phoenix-theater-build-thread.html. The actual soffit build BEGINS here: http://www.avsforum.com/forum/19-dedicated-theater-design-construction/1508600-phoenix-theater-build-thread-post31166993.html.
I will eventually be converting all of the build into YouTube and/or blog entries in a more concise and compiled form but for now it’s all on AVS taking up many many posts for each installed item.